In this post, we will tell you what the process of doing a Norton com setup is. But, before we are going to talk about this, first, let’s know what https www Norton com setup is? Well, as you know, it is one of the renowned giants of tech in today’s time. Norton Antivirus is available in various versions such as Norton 360, Norton antivirus plus, and Norton security deluxe.
It is one of the best security software suite for any PC. You might have already used one or all of Norton’s tools at your home or office. If you don’t have Norton in the PC of yours, get the setup from Norton com setup. Now, you should know how to install or download the Norton setup. Thus, you have to read the below section.

Steps For Installing Norton Com Setup
It is necessary to have the Norton subscription or package for using downloading the Norton.com/setup. Suppose you don’t have the same, you can quickly get the same from the official or third-party website or nearest retail store. By using these steps, you can download the setup of the Norton on Mac and Windows: –
- You need to go the site of Norton com setup and get the desired productive suit from there.
- You will have to select the ideal Norton version from the options, which are available.
- Choose the package, add it to the cart of Norton com setup activate.
- When you have added, it makes the payment of the same.
- If you don’t have a Norton account, you need to create one.
- For students, there is an exemption. They can even login with their ID card.
- Now, click on the ‘Option’ button from the homepage.
- You will now see the listed products of Norton on your screen.
- Find the desired outcome of Norton that you want via the Control+F command. And scroll it to the bottom of the screen for finding the one that you want.
- Read the description that is given with the product. And check whether your computer has the same specification as asked in the work or not. Suppose it is compatible, hit the Install button present on the screen.
- Your Norton setup will start downloading soon.
So, that’s how your desired Norton product will download successfully to your PC. Even you can move for the installation process. Now, you might be thinking of how to install it in the Mac and Window. So for that, you need to read the next section.
Way Of Installing Norton For Mac And Windows
The process to install the downloaded Norton com setup is not the same in Mac and Windows PCs. You will have to install the format in a different way on both the devices. Here are the installation steps for both Windows and Mac: –
Process For Norton Setup Install In Windows
- Visit the folder where you downloaded, or Norton setup install.
- Basically, the downloaded files are found in the ‘Downloads’ folder.
- At a time, you see the setup file through anyway, double-click on it.
- Choose the Yes option available on the next screen.
- The Norton com setup will be successfully installed in a while.
- Hit the Finish button at last when it prompts on the screen to complete the installation process.
Norton Setup Installation For Mac
- First, use the finder in Mac of yours to locate the downloaded file.
- At a time, you find the downloaded file, double-click on the same, and then choose the Next option.
- Read the terms and Conditions on your screen and hit the ‘I Agree’ button when you are done satisfied with what you read.
- You will now see the button to continue on the screen, so you need to click on it.
- Later, click the Install button, and you will be asked to enter your Mac’s security password.
- Give the same and then hit the Install Software button at last.
- The installation process will begin, and once you hit the Finish button, the Norton product that you wished will be installed successfully in your Mac.
Process For Activating The Norton
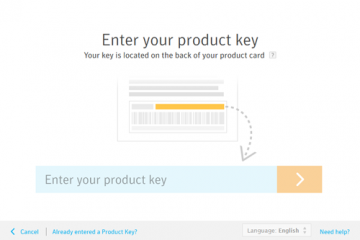
A valid product activation access will be essential for you to activate your installed product of Norton. You can get the product access from the product purchased mail or the retail card. Follow these steps for activation: –
- After you successfully install the Norton com enroll product key, you will see the shortcut to open it. On the taskbar or main screen of yours.
- Launch the installed Norton program and go to the Activate section.
- Tap on the Activate button and wait for the wizard to arrives.
- Choose to activate Norton when it asks you.
- Go to the screen by clicking the Next option.
- You will be asked to enter the product activation key now.
- Give access in the requested column and follow the given instructions on the screen.
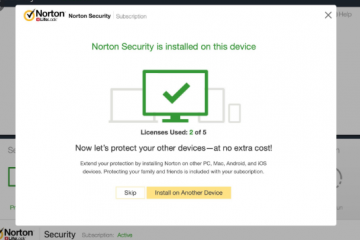
- Your Norton com setup product will be successfully activated in your device.
We hope by reading this post blog of our, you must not only know the process of Norton com setup by also, how to install it. So, if you find our blog page useful, then do share our post with the people who needs it. Lastly, do tell us your views on our blogs on manage Norton com.

0 Comments